Deploying Dask on Kubernetes Cluster
Prepare custom images
Notebook server
The demo notebook uses the following Python dependencies:
dask==2021.6.0
dask-core==2021.6.0
distributed==2021.6.0
hvplot
ipywidgets
matplotlib
netcdf4
xarray
The correct version of dask, dask-core, and distributed, as well as Dask-specific JupyterLab extensions, are included with the daskdev/dask-notebook.
To build a Docker image with the extra packages pre-installed, use this Dockerfile:
# Replace 2021.6.0 with the desired version
FROM daskdev/dask-notebook:2021.6.0

RUN conda install -y -c conda-forge \
        hvplot \
        ipywidgets \
        matplotlib \
        netcdf4 \
        xarray && \
    conda clean -a -y
Dask worker
The demo notebook uses the following Python dependencies:
dask==2021.6.0
dask-core==2021.6.0
distributed==2021.6.0
hvplot
matplotlib
netcdf4
xarray
The correct version of dask, dask-core, and distributed, as well as Dask-specific JupyterLab extensions, are included with the daskdev/dask.
To build a Docker image with the extra packages pre-installed, use this Dockerfile:
# Replace 2021.6.0 with the desired version
FROM daskdev/dask-notebook:2021.6.0

RUN conda install -y -c conda-forge \
        hvplot \
        matplotlib \
        netcdf4 \
        xarray && \
    conda clean -a -y
Deploy a Dask cluster with Rancher
The following step assumes deployment with Rancher. Screenshots are created with Rancher v2.5.8.
Add Dask’s Helm charts
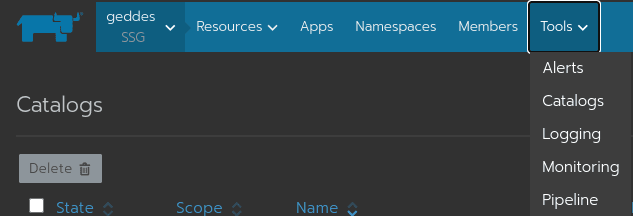
- Navigate to your project in Rancher, click “Tools”, then “Catalogs”
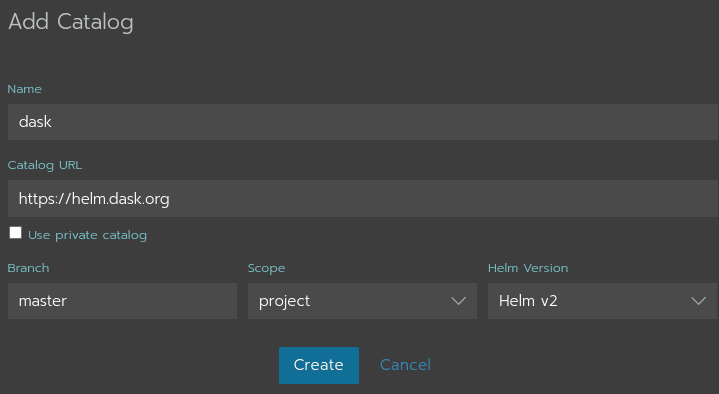
- Click “Add Catalog”
- In the pop-up dialog, set “Catalog URL” to
https://helm.dask.organd “Helm Version” toHelm v2.
Launch Dask from the Helm chart
- Click “Apps” on the top bar, and click “Launch”.
- Select
daskin the Catalog page. - Under “Configuration options,” select an appropriate name, template version, and namespace
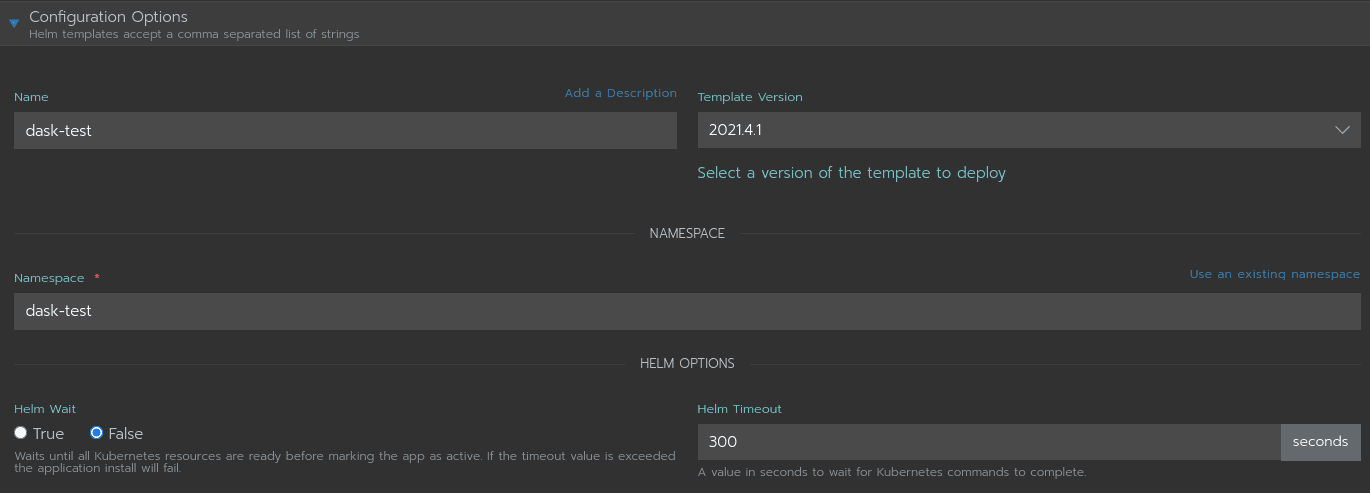
- Next to “Answers,” click “Edit as YAML”, and enter the following YAML
# Start worker with a custom image
worker:
  image:
    # Replace repository with the actual image repository
    repository: geddes-registry.rcac.purdue.edu/dask/dask
    # Replace tag with the version. Should match the Helm template version
    tag: 2021.6.0
    pullPolicy: Always
  # Set the desired number of workers
  replicas: 5

# Start scheduler with a custom image
scheduler:
  image:
    # Replace repository with the actual image repository
    repository: geddes-registry.rcac.purdue.edu/dask/dask
    # Replace tag with the version. Should match the Helm template version
    tag: 2021.6.0
    pullPolicy: Always

# Start Jupyter with a custom image
jupyter:
  image:
    # Replace repository with the actual image repository
    repository: geddes-registry.rcac.purdue.edu/dask/dask-notebook
    # Replace tag with the version. Should match the Helm template version
    tag: 2021.6.0
    pullPolicy: Always

# Or, Disable Jupyter Notebook if it's hosted elsewhere
jupyter:
  enabled: false
Open Ports
TODO
Install Demo Notebooks
Create a persistent volume
-
Navigate to your project in Rancher, click “Volumes”, and then click “Add Volume”
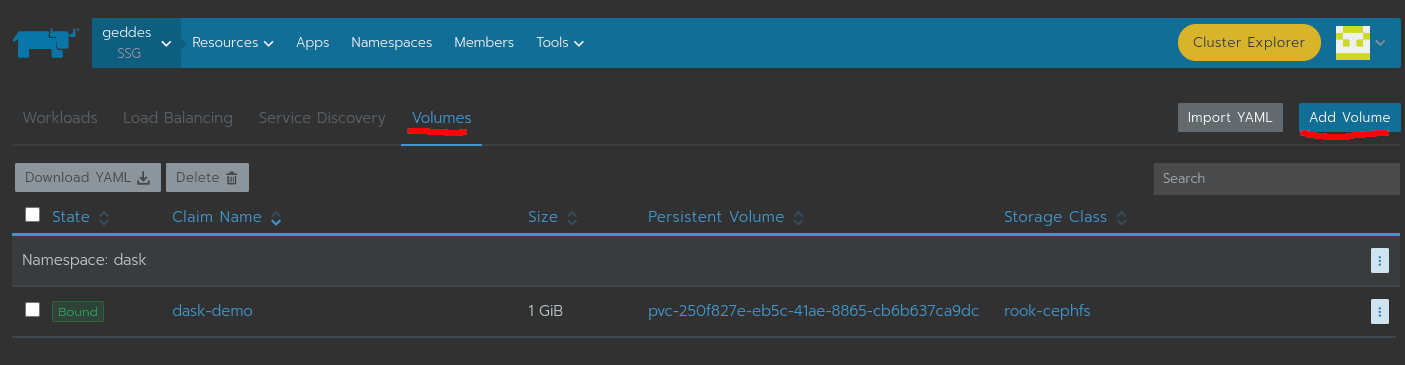
- On the “Add Volume Claim” page, enter a name of the volume, the appropriate namespace (
dask), the appropriate storage class, and the desired volume size (1GB is enough for the demo repo). -
Expand the “Customize” section, check “Multi Nodes Read-Write” and uncheck everything else. The completed “Add Volume Claim” form should look like this.
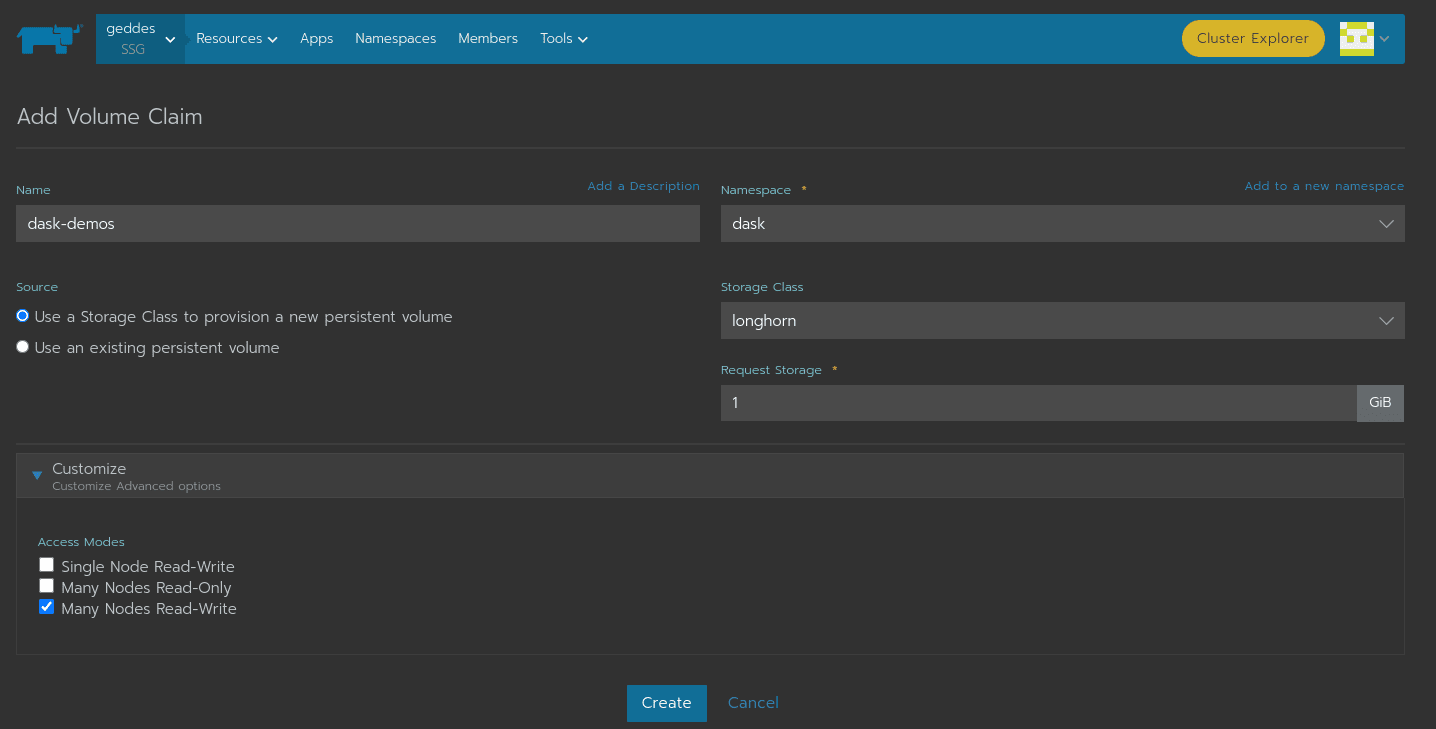
- Click “Create” to create the volume.
Mount the persistent volume to containers
You need to mount the demo volume to /home/jovyan/_demo on the notebook server and workers containers.
- Return to the “Workloads” tab
-
Locate the notebook container (usually named
dask-jupyter), click on the...next to it, and select “Edit”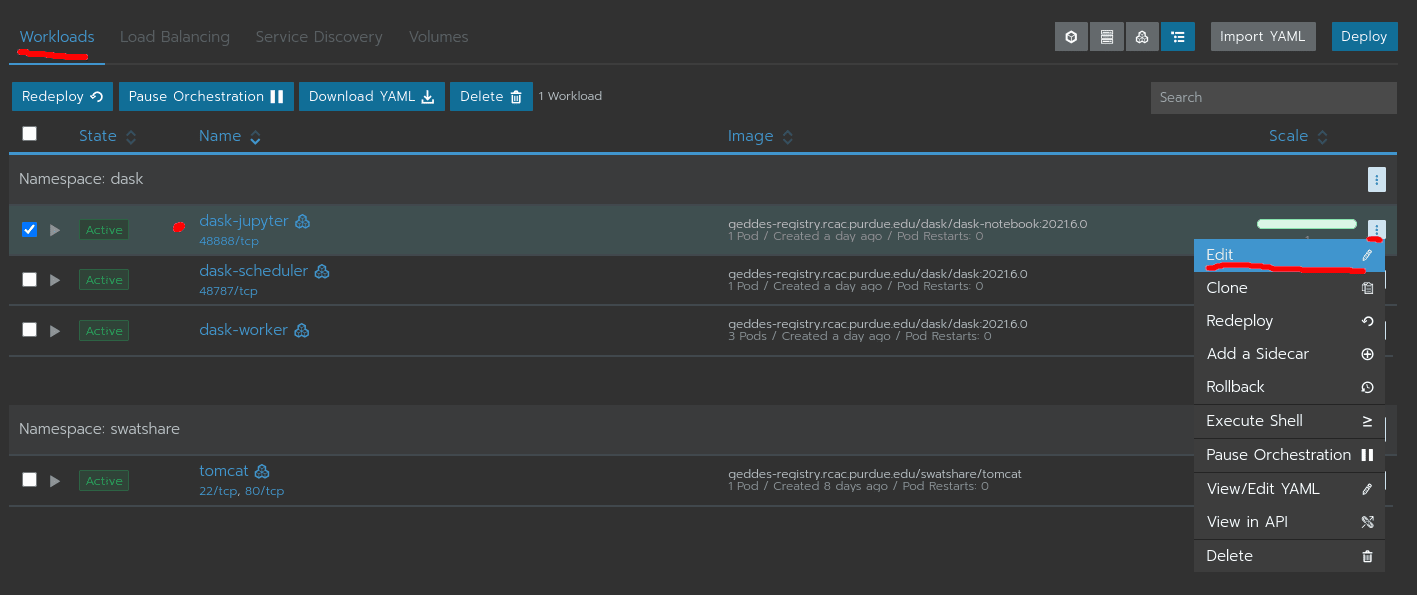
-
Expand the “Volumes” section, click “Add Volume…”, and select “Use an existing persistent volume (claim)” in the dropdown menu.
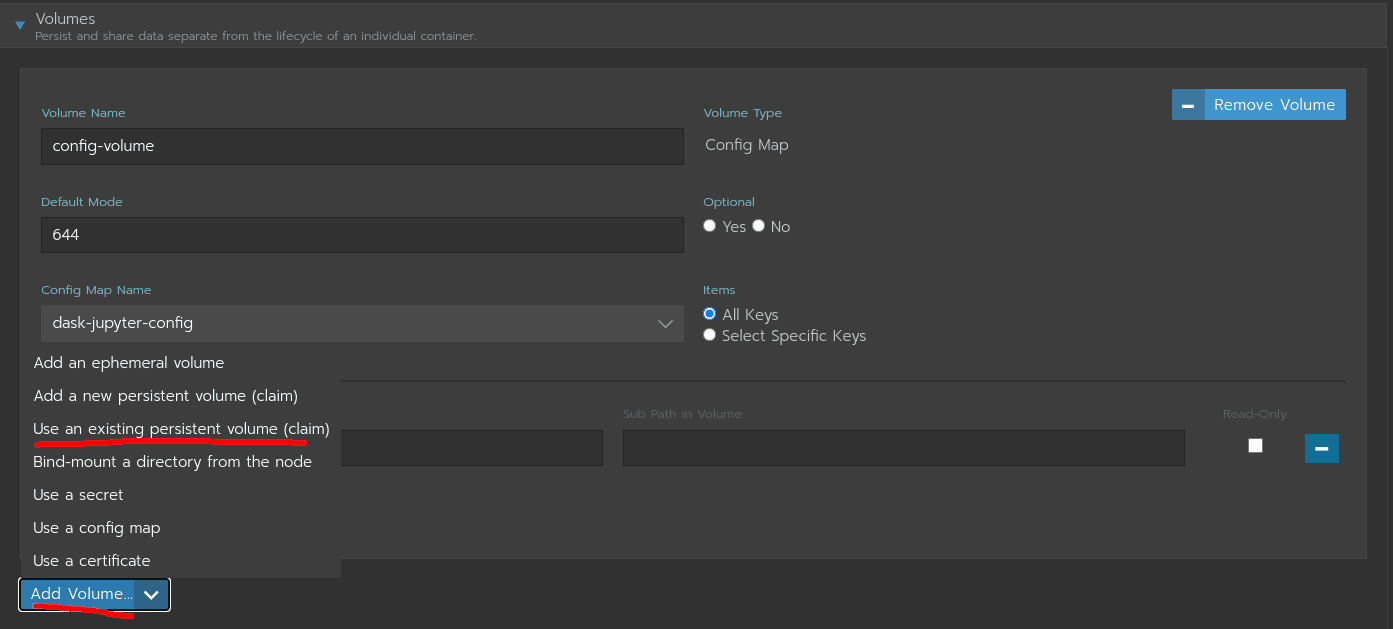
-
In the new volume, select the appropriate volume under “Persistent volume claim”, and set the mountpoint to
/home/jovyan/_demo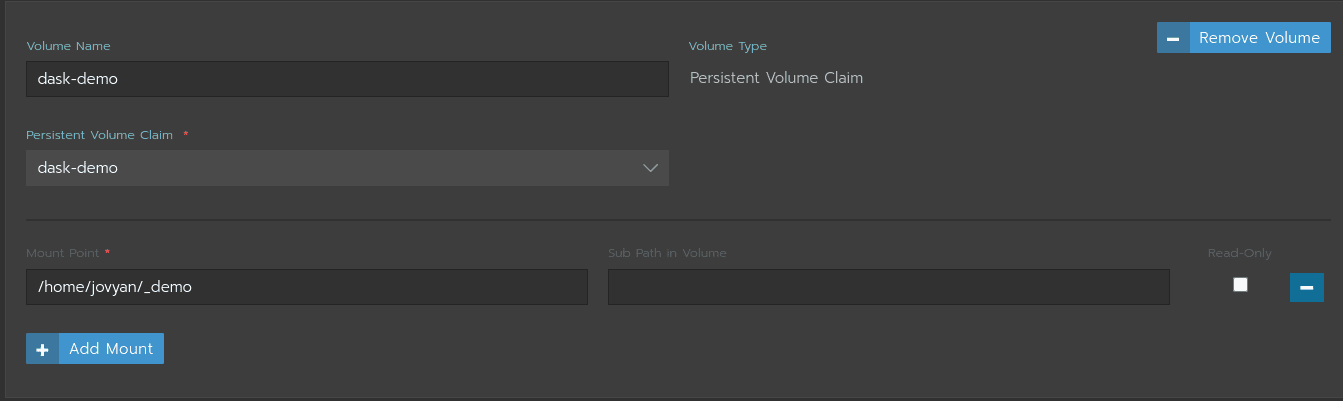
- Click “Save”. The containers will be updated and redeployed.
Repeat these steps for the workers containers (usually named dask-worker).
Clone and set up demo repository
Log in to JupyterLab, and open a new terminal.
# Clone repository into `_demo/`
git clone https://github.itap.purdue.edu/xiao253/dask-demo.git _demo

# Create data directory
cd _demo
mkdir data

# Download data files
wget --directory-prefix data -i download_list.txt
Once you’re finished, type exit to close the terminal.
Make the volume read-only
Once the demo environment is set up and tested, you should make the demo volume read-only to avoid unwanted edits.
-
In the “workloads” tab, locate the notebook container (usually named
dask-jupyter), click on the...next to it, and select “Edit” -
Expand the “Volumes” section, locate the volume you added earlier, and check the box under “Read-only”.

-
Click “Save”. The containers will be updated and redeployed.
Repeat these steps for the workers containers (usually named dask-worker).